Monday, May 22, 2023
-
6
min
Conquer the Chaos: A Developer's Guide to Taming Expo’s Environmental Variables

Read a more recent version of the guide here.
Expo is a popular framework for building React Native apps, providing developers with great flexibility on how to build and where to define their environmental variables. However, without proper management, the declaration of variables can quickly become a tangled mess.
In this article, we'll guide you through organising your environmental variables, ensuring you always know which environment your app is running in.
Read "Balancing between platforms: Native and Web app development with Tamagui".
A Developer's Guide to Taming Expo’s Environmental Variables
With Expo, we can run our app in development mode locally using the 'Expo Go' client or our own custom build 'Expo Dev Client'. We can also utilise 'EAS build' to create custom 'Expo dev clients' or production builds of our app. Building with 'EAS build' offers us the flexibility of using the online service or building locally.
We have even more choices for defining environmental variables in our projects. We can define them in .env files, directly in our CLI environment, within our app.config.js file, in our eas.json file, or even in EAS secrets online.
Remember, "With great power comes great responsibility." When declaring environment variables, it's essential to manage them properly. This is especially true when defining various staging environments like "production," "preview," and "developer-preview." Variables may be defined in different locations, such as .env files and eas.json, to allow for running and building in different environments - locally, online, or with CI/CD. However, this can lead to a messy situation with .env files spread across multiple developers' laptops and stored in different locations.
Before we dive into ways to keep all of this chaos organised, let's start with a quick recap of the following:
How Environmental Variables Work in Expo
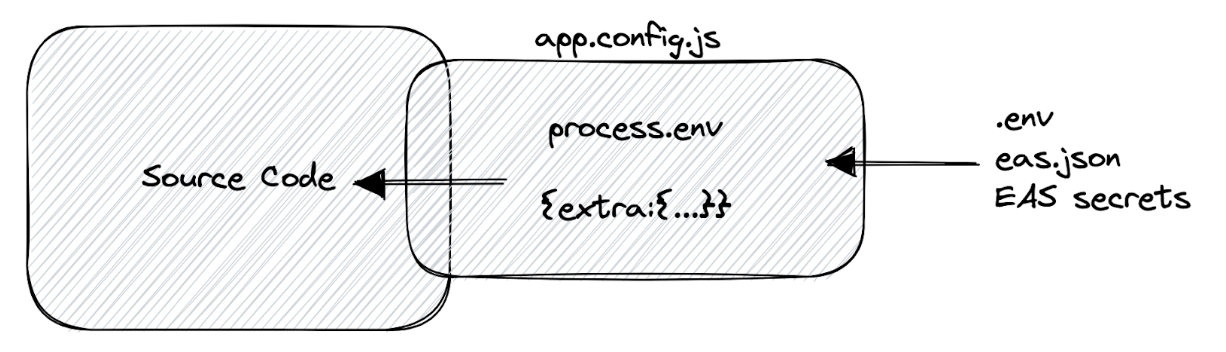
It's important to note that accessing environment variables directly via process.env in a React Native app, as we would in a React app, isn't possible. Luckily, Expo offers a solution. We can define the extra object in app.json/app.config.json, which can hold our custom variables.
app.config.js can access process.env, which means it can inject environmental variables into the extra object. These variables can come from various sources, such as:
.env files:
CLI environment:
Eas.json:
EAS secrets:

The diagram below summarizes this:
To add some complexity, certain methods of declaring environmental variables are only available for specific build/run environments. Not all environments support the same methods.
The diagram below summarises which method is available where:

For instance, if we define a variable in EAS secrets, we won't be able to access it when we run the eas build --local command.
Furthermore, if a specific environmental variable is declared in multiple locations, a priority system is in place to determine which value will be injected into the application.

If a variable is declared in EAS secrets, it will take precedence over the eas.json file. If the variable is missing from eas.json, the system will search for it in the environment.
As we can see, this can quickly become chaotic - especially when we're dealing with multiple stages of our application like "developer-preview," "qa-preview," and "production."
Mastering Environment Variables: Strategies for Managing Complexity
Here's how to declare variables in our Expo project. This guide will help us build different staging environments, keep variables in one place, and securely manage confidential variables. It should suffice for most of our projects.
Step 1: Decouple Application Code from Environment Sources
Our first step is to separate our application code from environmental dependencies. We must ensure that our application doesn't reference any process.env or extras object in the codebase. Instead, we'll import essential environment variables from a single file, such as environment.ts or config.ts.
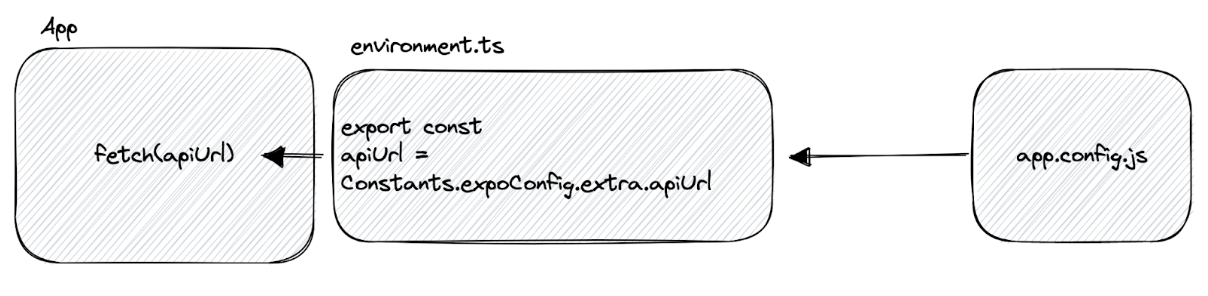
This file is the only one in our app that will be aware of our environment. It's responsible for importing and exporting all environment variables to our app code, typically from the extra object. This approach has several benefits:
- We can easily change the system/methods for importing environment variables by modifying this file. We don't have to track down changes throughout our codebase.
- We can declare static configuration options that don't change with our stages but that we may want to modify in the future (e.g., a theme name or default timeout for network requests).
This file will serve as our codebase gateway to the external configuration environment.
Step 2: Hardcode the environment variables in app.config.js
At first glance, hardcoding variables in the configuration file may seem insecure. However, it's important to understand that any variable injected into our application code can be discovered, as it will be included in the app bundle. By hardcoding it to our app.config.json, we can save it in our repository, avoiding the need to share files across different developers and building environments. Later on, we will discuss handling real secrets that our project may require.
Step 3: Define the stages directly in our app.config.json
We define the different stages of our project inside the app.config.json file and control the switching at build time with a single environment variable like STAGE.
This approach enables us to centralise all our environmental variables in a single location, making it easier to manage them.
Step 4: Defining the STAGE Variable for our Project
Now we can easily switch the environment by setting just one variable, STAGE. This gives us greater flexibility and control.
For example, if we want to run a specific stage locally, we can enter the appropriate value in our package.json script.
Or for eas build it is recommended that we host the STAGE value in eas.json.
Step 5: Handling the real secrets
Now we always have to deal with real secrets, or for some stages, we might be reluctant to check them into the codebase.
Our only option here is to use our environment to hide these secrets from our codebase. So it will be a “git-ignored” .env file and/or EAS secrets or other CI/CD.
Then we can import these into our app.config.js. We still keep our app.config.js as our gathering point of environment variables.
Once again, it is important to emphasise that if a secret is included in the app codebase, such as through the extra object, it is not truly secure. A genuine secret might be something like a "Sentry" token used to upload source maps to the "Sentry" service during the build process.
To manage the SECRET variable securely, we need to host it in the appropriate place where it is required, such as .env, EAS secrets, or the CI/CD environment.
However, it's essential to remember that we should aim to keep the number of "moving parts" to a minimum to make the project more manageable. For example, the SECRET value may only need to be a secret in the production stage, but we don't need to worry about it in the "dev" stage, so we can have the "dev" SECRET hardcoded.
So assuming that we only build for "Production" on EAS services, we need to keep the SECRET_PROD value updated in EAS secrets. Most developers can check the project and start working on the "dev" environment. If a developer needs to run, for example, "production" locally, we can provide a specific .env file that contains the production secret to minimise exposure.
Takeaways
- Keep environment variables in one place for easier maintenance.
- Hardcode as many variables as possible in app.config.js and check them in with the codebase to reduce maintenance.
- Not all variables are real secrets; if they are used by the application codebase, they are not truly secret.
These practices are not set in stone and may vary depending on the project's needs, but they provide a solid setup.
Happy Coding!
Enjoyed this dev tutorial? Make sure to sign up to our montly newsletter "Defining the Morrow" so you never miss a new blog!
Ready to discuss your project? Request a free discovery call with Oli here.
The cover image was generated using DALL·E AI system.

.jpg)